

The users for the app will be Western Sydney University Students who catch the shuttle buses at any WSU campus.
2. How will users use your X?
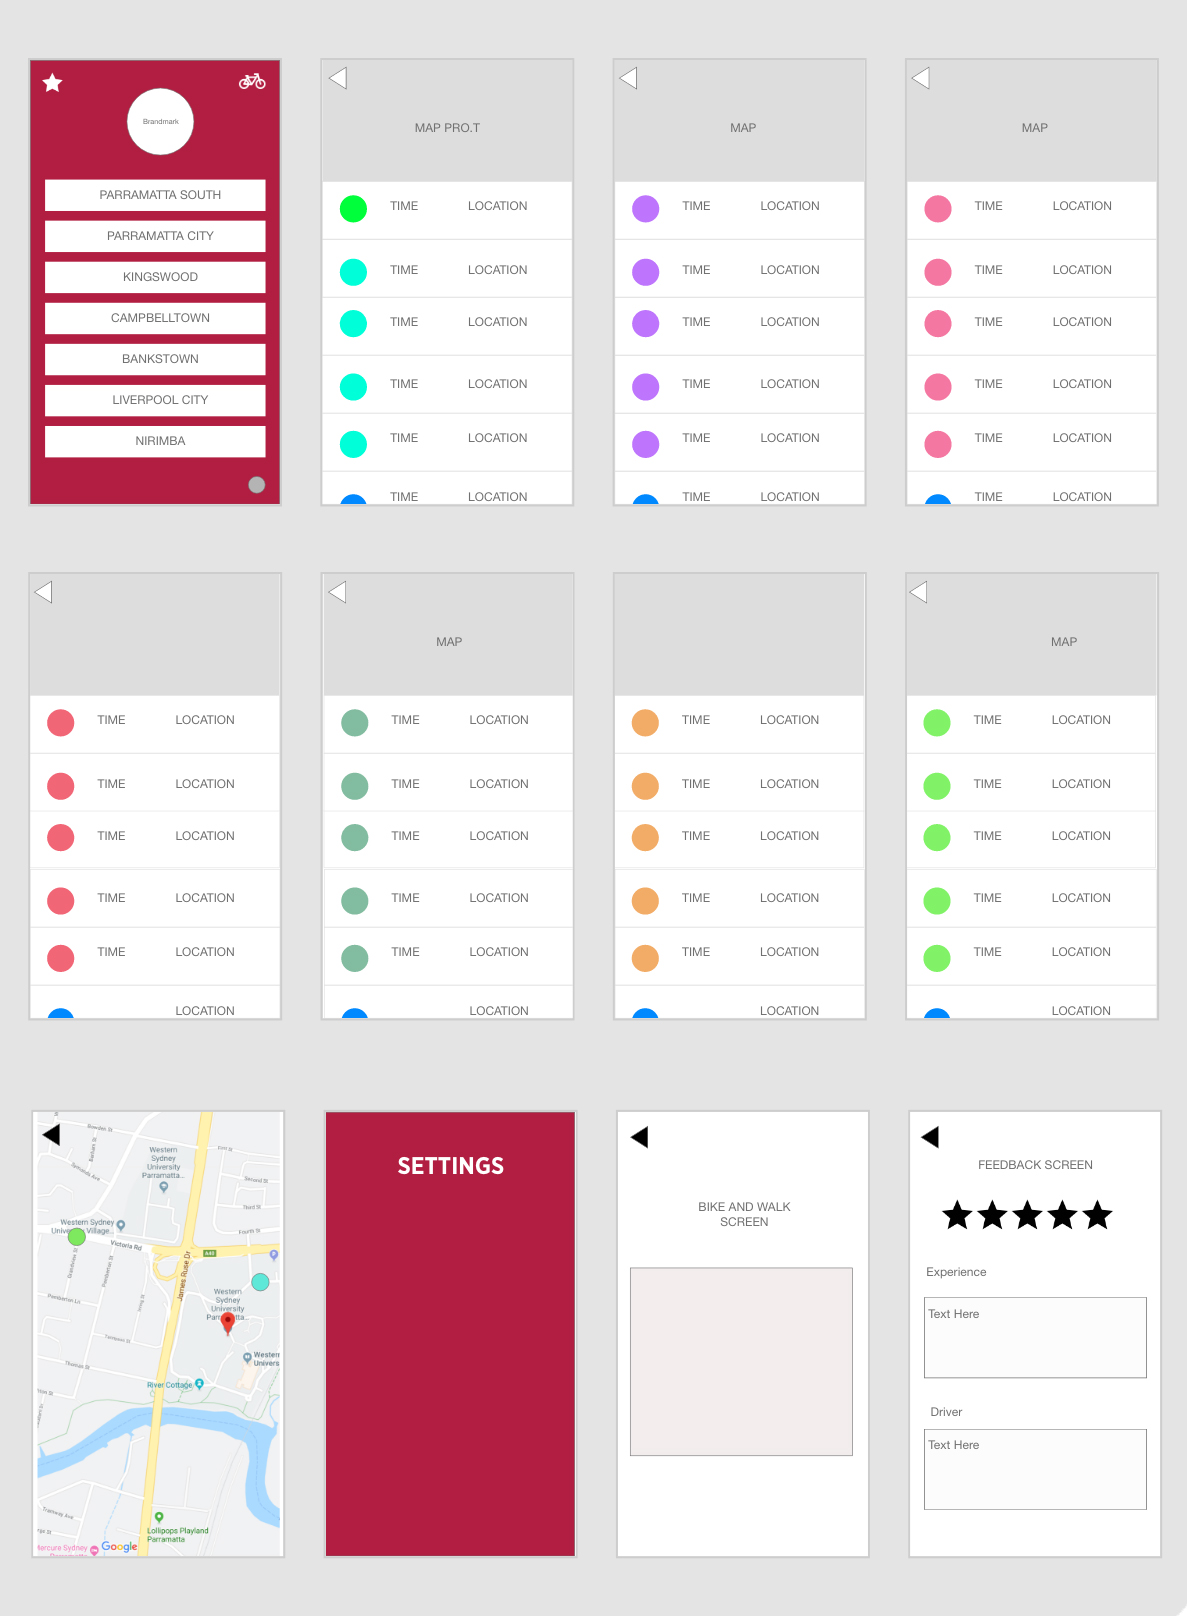
The users will download the application from apple app store, the users will have a selection of the WSU campuses, from there the user will given a timetable with active map with approx.. times.
3. Where will they use it?
The users will most likely be located at a campus when using the application. The students will be using it before/after a class. The student could also be using it at home when preparing for their day. Eg. taking in factors for their day of travel.
4. Why will they use it?
The students will use the app to get an understanding of what times the buses are arriving and leaving and also know whether or to walk/ride a bike to the destination/next campus.
2. What does the X need to do?
The app will serve as a central point to lead the user to times for shuttle buses for their WSU campus. The app will inform the students with a timetable, live map and also with information for alternative ways of transport such as walking or riding a bike.
User Scenario:
Lisa is a Western Sydney Student who has just finished a class, she knows she needs to be at Parramatta Station at 3:30 for the train, so she has time to catch her bus from Penrith at 4:10 to get home. As she approves the front of the EA building, she notices a giant line that runs for 100m for the bus with no buses waiting. She checks the app to see where the nearest bus is and what time the next few buses are coming. This gives her time and an idea whether it’s faster to walk to the Parramatta city campus or wait it out for the bus to get to the train on time.
Understanding the Device
“If you want to understand the smartphone, you need to use the smartphone.” If you’re building an app for iOS you need to use and explore with an iPhone to gain an understanding on how the phone works.
GESTURES:
“The Tap” – The pressure on the glass to contact the screen to open an app or object.
“The Drag” – the movement on the screen, an example is the slide open button the phone or the dragging an app.
“The Flick” – less movement, quicker movement
“The Swipe” – Used for menus and photos. A controlled and faster drag.
“The Pinch” – Zoom in & out on photos and maps
Random Gestures include the shake function
Part 2 UI –iOS Anatomy
Summary: This weeks’ lecture focuses on the gestures and the simple understanding of the device you’re using. I learnt the first few seconds is important to capture the user. So you want to provide a simple experience so that you don’t scare the users off. This lecture was great for my app development in terms of using gestures such as swiping and the flick for a greater experience for your audience. I will be using these gesture to improve my app flow.
Summary: This article went over the most important aspect during the process of creating an application for the mobile. After reading the article, I gained an understanding on how to maintain an app, the different stages of development, the visual approach and why it’s all needed to produce an useable app that is effective. Every single aspect is key while building as it all links together to get the app working smoothly and successfully.
Week 2: App Design and Development Process
New Devices such as apple watches are now new challenges for designers to learn this medium and how to work with features within this technology. Compared to print design which was a major field in graphic design where most designers only focuses on this style.
Apple 90s vs Apple Now (Top Links)
Change the Way You Work:

Most designers are should start with drawing the designs and ideas on a piece of paper. Drawing gets straight to the point.
Understand Development
Use a variety of operating Systems
Get close to all devices. Never work on just one style of device such as iOS. Working on Android and Windows phones allows you to create an app that works and gets the message across.
Prototype Everything & Prototypes can start with a simple piece of wood.
Summary: The important aspect I’ve received from this weeks’ lecture was to plan out and sketch out my ideas when starting my app process. Sometimes it’s best to get a better feel for the app on a piece of paper and write out your plans for the next steps. Also to always work on the device you’re creating for, for example use the iPhone to get familiar with the iOS feature so you can create the best app possible to your ability.
Before:

After:

Now includes a search engine, down to 6 icons, a bar (lower screen) that allows easy access to other features & a shuttle bus feature that showcases a timetable.

App:
Application
Web App (html 5) – Responsive Web Design – small screens/touch
Hybrid App – Elements of both native and web apps
Native App – run directly on a mobile device (run in a mobile device) Eg. Photoshop
Research shows mobile use is extremely important when dealing with brands/issues.
55% say a poor app experience will lead to a negative effect on the brand.
(Web App) HTML:
Pros:
Cons:
Hybrid:
Pros:
Cons:
Native:
Pros:
Cons:

6 Basic Apps:

Important elements in app design:
Summary/Key Notes: This week’s lecture focuses on the importance and the basics of application design. It was great to learn the pros and cons early on in this subject, so that I don’t face these problems later in the semester. Overall, this lecture was great as it refreshed my understanding of the different style of applications such as a web app (html 5), hybrid & native which I learnt last year, and the important elements every app should have.
This is an example post, originally published as part of Blogging University. Enroll in one of our ten programs, and start your blog right.
You’re going to publish a post today. Don’t worry about how your blog looks. Don’t worry if you haven’t given it a name yet, or you’re feeling overwhelmed. Just click the “New Post” button, and tell us why you’re here.
Why do this?
The post can be short or long, a personal intro to your life or a bloggy mission statement, a manifesto for the future or a simple outline of your the types of things you hope to publish.
To help you get started, here are a few questions:
You’re not locked into any of this; one of the wonderful things about blogs is how they constantly evolve as we learn, grow, and interact with one another — but it’s good to know where and why you started, and articulating your goals may just give you a few other post ideas.
Can’t think how to get started? Just write the first thing that pops into your head. Anne Lamott, author of a book on writing we love, says that you need to give yourself permission to write a “crappy first draft”. Anne makes a great point — just start writing, and worry about editing it later.
When you’re ready to publish, give your post three to five tags that describe your blog’s focus — writing, photography, fiction, parenting, food, cars, movies, sports, whatever. These tags will help others who care about your topics find you in the Reader. Make sure one of the tags is “zerotohero,” so other new bloggers can find you, too.
